Wednesday, August 12, 2015

Tudor Embroidery Needles


While researching for my next blackwork embroidery project, I first wanted to find out what period embroidery needles were used (what size were they, what were they made out of, how were they made, etc).  Here is what I found so far: 

By Elizabethan times, needles could be found in steel, bone, brass, and bronze.  Bone needles were most likely used for other crafts such as nalbinding.  Steel was most likely used for making embroidery needles.  In the Viking era, needles were also made from iron.


Viking needles from Coppergate

http://cathyscostumeblog.blogspot.com/2011/05/eye-of-needle-revisited.html


Thimbles, needles, shears, medieval. photo fingerbol_nale_saks_middelalder.jpg

Pictured above are medieval thimbles, needles, and shears from the National Museum in Copenhagen.

http://s389.photobucket.com/user/Haandkraft/media/Museer/Nationalmuseet/fingerbol_nale_saks_middelalder.jpg.html#sthash.D8rnQ6Op.qjtu


Detail Portrait Constanza Caetani, pins, sewing needle and open thimble, 1480-1490, National Gallery, London  https://fbcdn-sphotos-g-a.akamaihd.net/hphotos-ak-xaf1/v/t1.0-9/283860_458064614271779_1437169782_n.jpg?oh=c37a212b9285ae6207cf9a92a2e4e4ad&oe=54D247E4&__gda__=1426692661_9ec48935334dcaab4c825b7b57006aa8


Enhanced portrait of Costanza Caetani (circa 1480-1490) with pins, thimble, and sewing needle.


http://www.nationalgallery.org.uk/paintings/style-of-domenico-ghirlandaio-costanza-caetani


Amb. 279.2° Folio 58 recto

The Needlemaker (1583)
http://www.nuernberger-hausbuecher.de/75-Amb-2-279-58-r

Monday, August 10, 2015

Blackwork Embroidery Patterns


Portrait of Jane Seymour (third wife of King Henry VIII of England) painted by Hans Holbein the Younger (circa 1540)


Pattern for the cuffs on Jane Seymour's sleeves (pictured above)


--------------------------------------------------------------------------------------------------------------------------


Hans Holbein the Younger. Detail from Portrait of Jane Seymour, Queen of England, 1536.  #HansHolbein #JaneSeymour #VonGiesbrechtJewels: Hansholbein Janeseymour, 1536 Details, Han Holbein, Jane Seymour, Art Details, Hans Holbein, Portraits, Younger, Queen Of England

Another portrait of Jane Seymour's cuffs (circa 1636) by Hans Holbein


Pattern from Detail of a blackwork cuff, portrait of Jane Seymour by Hans Holbein, 1537: Blackwork Cuffs, Blackwork Schemi, Blackwork Patterns, Men'S Blackwork, Blackwork Shirts, Collars, Seymour Charts, Blackwork Embroidery, Photo
The blackwork embroidery pattern for the cuffs pictured above.


--------------------------------------------------------------------------------------------------------------------------


Blackwork embroidery pattern from neck ruff of James Stewart, Earl of Moray (half-brother to Mary, Queen of Scots). 

http://www.geocities.ws/lynnaea_fairchild/designs.html

Sunday, March 22, 2015

Blackwork Embroidery on Pillow Covers

Here are a few examples of blackwork embroidered pillow covers that existed circa 1600 AD in England:


"Black silk embroidery on linen in double running, stem, and coral stitches, with buttonhole fillings. All around runs a wavy border of foliage and flowers. The field is occupied by a symetrically arranged design of interlaced scrolling stems which bear a great variety of flowers (rose, honeysuckle, carnation, columbine, sweetpea, etc.)." (http://collections.vam.ac.uk/item/O317151/pillow-cover-unknown/)


"Coiling vine-stems," (http://collections.vam.ac.uk/item/O317803/pillow-cover/)


Pillow cover

(http://www.metmuseum.org/collection/the-collection-online/search/228956?rpp=30&pg=1&rndkey=20150322&ft=*&what=Embroidery%7cPillows%7cLinen&pos=9)


For my latest project, I am working on embroidering a pillow cover. My pillow cover is not as elaborate as the ones pictured above, but I prefer simple patterns that are not as busy as the ones pictured above.


Here are pictures of my progress thus far:


Monday, February 16, 2015

Embroidery Frames in History

At the last two blackwork embroidery classes that I taught, inquiries came up about what type of frame to use. While doing some research, here is what I have discovered so far.
 
Circular frames appear to have emerged in history during the 18th century. This frame style was popular with tambour work, as seen below.


Tambour frames work well with embroidering small items, such as a handkerchief.  Below is a portrait of Madame de Pompadour with her tambour work.


However, prior to this time period, slate frames were used for embroidery.  A slate frame helps to keep the fabric taut while it is being embroidered, allowing for even stitches. A slate frame has four perpendicular sides with pegs or notches to help keep the fabric secure.
 
Below is an example of a slate frame.


One can use a scroll frame and dress it up to work as a slate frame. Below is an example of a scroll frame being used as a slate frame.


Here is an example of silk embroidery done in 1568:
 
File:De Stände 1568 Amman 031.png  (Standebuch, 1568)
 
Standbuch 1568 woodcuts of embroiders in shop (Same picture as above)


Below are other various historical examples of slate frames being used for embroidery.

(Album Amicorum of Gervasius Fabricius, 1603)
 
 
Click! 
(painted by Francesco Cossa, 1476-84)
 
 
Libro quarto. De rechami per elquale se impara in diuersi modi lordine e il modo de recamare...Opera noua
(woodcut by Alessandro Paganini, 1532)
  (painting by Antonio Armorosi in 1720)


A dutch lady is shown embroidering on a frame, 1627.
(1627)


Works Cited
 
http://www.larsdatter.com/standebuch.htm
 
https://www.pinterest.com/isiscat/sewing-tools-embroidery-frames/
 
http://www.gutenberg.org/files/20776/20776-h/chapter_5.html#fig_198
 
http://www.bayrose.org/AandS/slate_frame.html
 
http://englishhistoryauthors.blogspot.com/2012/11/tambour-work.html
 
http://www.wga.hu/frames-e.html?/html/c/cossa/schifano/1march/1march_1.html
 
http://www.metmuseum.org/collection/the-collection-online/search/354979

Saturday, February 7, 2015

My Class Notes from today's Winged Hills Collegium event

 Today I taught another Introduction to Blackwork Embroidery at the Winged Hills' Collegium event. The class had a good turnout for the number of students. My apologies for forgetting to bring my binder which has various samples of blackwork embroidery as it was used during the Tudor era.

Here are portraits and website links to the portraits of some of the pictures I have in my binder collection:


graphic of designs from the 16th century Italian Sampler


Blackwork Embroidery « Save the Stitches!  Learn Blackwork embroidery with guides at Nordic Needle.  #blackwork #spanishwork #stitching #howto #embroidery #needlework


0_3c026_4b19d004_XL


A website to visit for various blackwork patterns is at http://www.blackworkarchives.com/.

Wednesday, December 10, 2014

My Class Notes from My Class at RUM

This year was the first year that I had ever attended RUM (Royal University of the Midrealm held on November 22, 2014). I chose to teach an Intro to Blackwork Embroidery class while there. Overall, the class went extremely well. At first, there was some confusion as my class was scheduled in one room and ended up being placed in a classroom across the hall.

With my class, I provided a binder for display that had various blackwork embroidery patterns (both historical and modern) as well as some printed portraits of people during the Tudor era with blackwork on their clothes. I brought in some of my examples for students to look at (some of my earlier projects with embroidery floss and a couple of later projects with silk thread to demonstrate the difference between these two).

I also provided a beginner's kit, which included a needle, some embroidery thread, and some cross-stitch canvas. I advised the ladies in my class that linen fabric and silk thread are period, while the items I provided were not period. However, with the items I provided, I have found to be quite useful when first learning how to do blackwork embroidery, as it helps one to count their holes and to get a feel for embroidering the pattern.

My class lasted for one hour.  I provided a bried basic history of how blackwork embroidery has been documented in England since Chaucer's time, but it really became popular with the nobility when Catherine of Aragon (first wife of Henry VIII) was queen.


A couple of the questions asked by students included:

1) Do you use a hoop or a frame?  Answer: A frame would be better, so your linen does not get stretched or warped.  I have only used a hoop, but have plans to use a frame in the future.

2) Is it recommended to use embroidery stabilizer or interfacing of any kind?  Answer: I have not used interfacing.  My preference is only for the basic items needed (a hoop or frame, a needle, silk thread, and linen fabric).
  • Note:  the lady who asked me this question said she would try it both ways to see if there is any difference.

Overall, I quite enjoyed teaching this class and look forward to teaching again!

Sunday, October 12, 2014

How To Start a Blackwork Embroidery Project

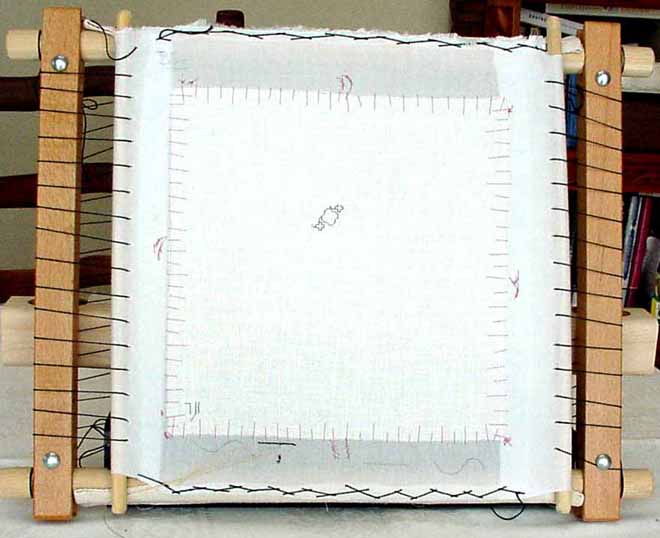
First, gather all of your supplies. Black silk thread and white linen fabric were the most commonly used items for blackwork embroidery in Tudor England. A frame to mount your linen fabric to would be best, that way the linen does not lose the shape of its weave. An embroidery hoop can be used. However, there is a fair chance that it will cause your linen fabric to become misshapen, causing your stitches to potentially not be taut and/or the pattern to lose its geometric symmetry.

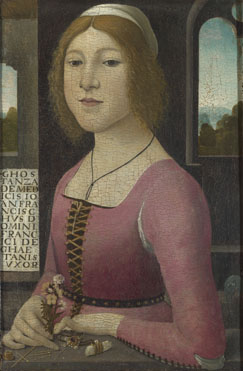
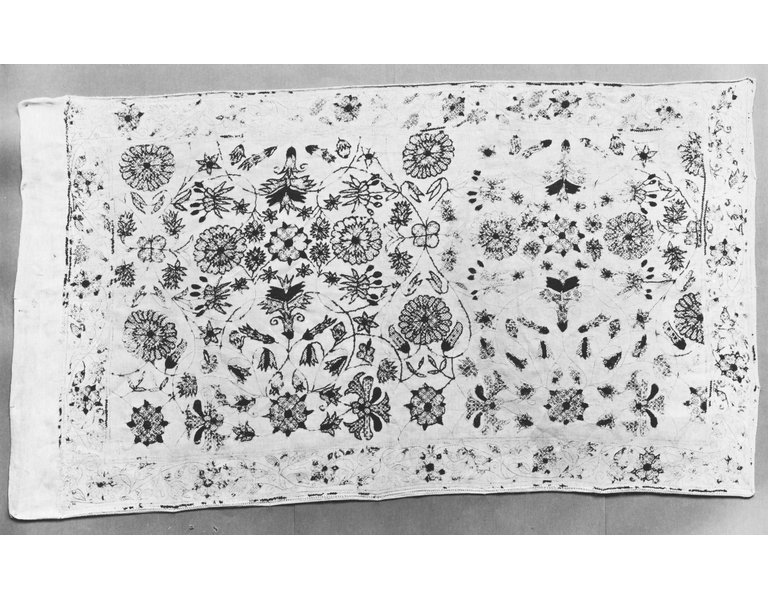
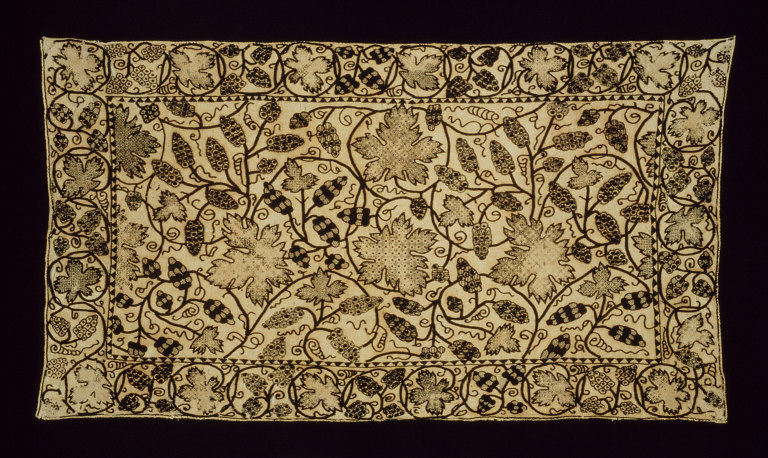
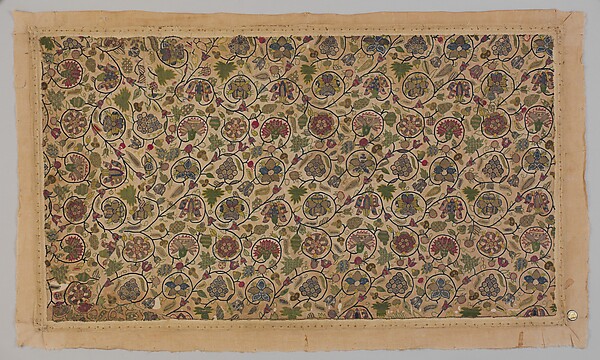
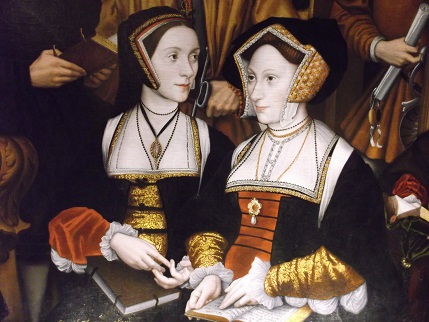
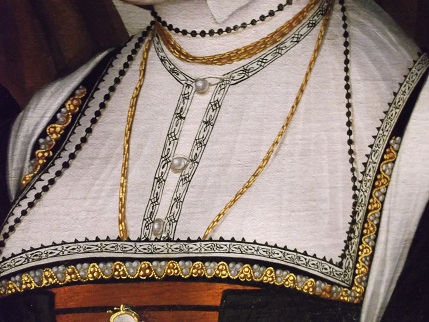
Next, select a pattern. Some patterns can be found from historic portraits, such as paintings done by Holbein. Also, decide where you want your pattern to go (on the cuffs of your sleeves, on a neck ruff, on the sleeves, etc). Study your pattern prior to beginning your stitches. It is wise to know what journey your needle will be taking before you start, to allow for less mistakes and hopefully a reversible design in the end.

Once you have everything prepared, then it is time to get started. Some embroiderers tie a knot at the end of their thread prior to starting. However, in my personal experience, I prefer to keep a small tail at the end and weave it into the stitches on the backside of my embroidery project. This tail does not make my project completely reversible, but it does allow for me to machine wash my items without too much fear of my embroidery stitches coming out.

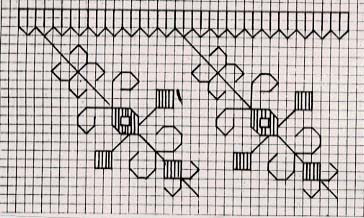
After deciding on how to secure the end of your thread, begin to feed the needle through the linen fabric. Take note of the weave of your fabric. For the linen fabric I have used on my blackwork embroidery projects, I count to every third hole to feed my needle through. As you are the artist and it is your project, it is up to you how large or small you would like your stitches to be. Blackwork embroidery is also known as a running stitch. To create this effect, go in and out with your needle creating a dashed line look. When you reach the other end of your fabric, then fill in the blank spots on your return journey. Once you arrive back at your starting point, you should have a complete line that is identical on both sides of the fabric.

For more complex patterns, the design may have to be broken up into portions. For example, if you are creating a basket weave design, then you may have to divide up the design by stitching the top half and later stitching the bottom half. The end result will be the completed basket weave design. This again is where studying your pattern's journey prior to beginning is quite helpful.

Please do not ever be discouraged. Practice makes perfect. I first learned how to do blackwork embroidery when I was a teenager. Now, after a decade has gone by, I am still learning things by trial and error.